How Do You Install an OPGW Cable Joint Box?
In the world of telecommunications, maintaining the integrity of optical fibers is paramount. However, improper installation of OPGW cable joint boxes1 can jeopardize the entire system. What if you could ensure a secure and reliable installation every time? This guide lays out the critical steps to achieve just that.
OPGW cable joint box installation involves several key stages: selecting the appropriate location, preparing both the cable and the joint box, splicing fibers, and sealing the joint box properly. Adhering to these steps ensures optimal performance and longevity of the telecommunications system.
Imagine climbing an iron tower to install a crucial joint box that safeguards communication lines. With the right guidance, every step becomes a calculated move toward ensuring seamless connectivity. Let’s dive deeper into this essential process.
What Is the Ideal Location and Height for Installing an OPGW Joint Box?
The location and height of an OPGW joint box are critical to its performance and ease of maintenance. Typically, the joint box is installed on the inner side of the iron tower, ideally at a height between 8 and 10 meters above the ground. This placement not only provides uniformity along the line but also protects the fibers from environmental exposure while ensuring easy access for maintenance.
To install an OPGW joint box, position it on the inner side of the tower at a height of 8 to 10 meters. This ensures both protection and accessibility, which are vital for long-term system reliability.
How Do You Prepare the Joint Box for Installation?
What Materials Are Optimal for Joint Box Durability?
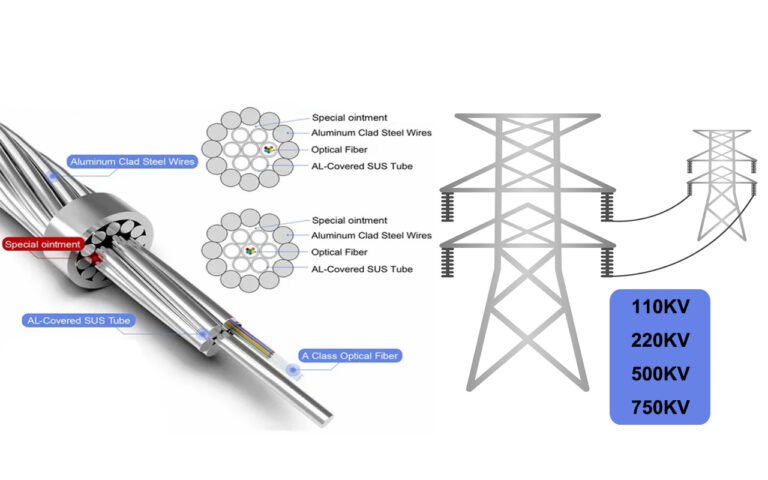
Ensuring that the joint box is constructed from durable materials is crucial for its longevity. Aluminium alloy2 is often recommended because it withstands heat, thermal radiation, air, ozone, and corrosion. Such properties are essential to protect the optical fibers housed within the box over time.
The joint box should be made of aluminium alloy to ensure resistance to environmental factors and maintain structural integrity over many years.
How Should You Prepare the OPGW Cable?
What Are the Key Steps in Cable Preparation?
Proper cable preparation3 is fundamental to a successful installation. Begin by marking the cable and making a precise circumferential incision at the designated point using a saw or triangle file. Remove the sheath carefully, clean the cable, and cut the strengthening member to the required length. Finally, secure it with attach screws to ensure stability throughout the installation.
To prepare the OPGW cable, make a clean incision at the marked point, remove the sheath, clean the exposed cable, and trim the strengthening member as needed—then secure it with screws.
How Do You Install the Cable in the Joint Box?
What Are the Steps to Properly Install the Cable?
Proper installation involves feeding the fibers through a transportation tube. Slide this tube over the metal loose tube of the cable, then clean and abrade the cable cylinder clamp and the closure ports. Next, remove the loose tube to expose the bare fibers. Place these fibers through a transparent PE tube and secure them with PVC tape. This ensures that the fibers remain stable and protected within the joint box.
Install the cable by feeding the fibers through a transportation tube, cleaning and abrading the clamp and ports, and finally securing the fibers with a PE tube and PVC tape.
What Is the Process for Splicing and Organizing Fibers?
How Do You Ensure Effective Fiber Splicing?
Effective fiber splicing is critical to maintain signal integrity. Begin by winding any excessive loose buffers in neat cycles and storing them in a designated basket. Coil the optical fibers in splice trays from the bottom to the top, perform fusion splicing, and then shrink the protective tubes to secure the splice within the tray. This method keeps the fibers organized and minimizes the risk of damage.
For effective splicing, organize and coil fibers in splice trays, use a fusion splicer to join them, and secure the splice with protective tubes.
How Do You Seal and Close the Joint Box?
What Are the Steps to Properly Seal the Joint Box?
Sealing the joint box is a critical step to protect the internal components from environmental hazards. Start by covering the base port and cable with heat-shrink tubes. Mark the tube end on the cable, apply an aluminum film, and heat the tube until it shrinks to form a secure, airtight seal. Then, close the joint box with a clamp, ensuring that it locks securely. Use Velcro strips to bind any splice trays, taking care to avoid sharp edges that might damage the fibers.
Seal the joint box by applying heat-shrink tubes over the ports and cables, then secure the closure with a clamp and bind the trays with Velcro strips.
What Are the Mechanical and Environmental Considerations?
How Do You Ensure the Joint Box Withstands Environmental Conditions?
The joint box must be designed to withstand various mechanical stresses and environmental conditions. Ensure that the fiber optic cable’s bending radius complies with manufacturer specifications (typically not less than 0.5 meters). Additionally, the joint box should have robust mechanical properties to resist vibrations, impacts, and temperature fluctuations. Excellent sealing technology is required to make the box both airtight and waterproof.
Ensure that the joint box meets the necessary bending radius and has strong mechanical properties to endure environmental stresses.
How Do You Mount and Equip the Joint Box with Accessories?
What Accessories Are Essential for Installation?
Mounting the joint box securely is vital. Use appropriate mounting kits4 that suit the specific environment. Equip the joint box with accessories such as stainless steel belt hoops to prevent direct electrical contact with grounding parts. These measures ensure both a secure installation and compliance with safety standards.
Mount the joint box using the correct kits and add accessories like stainless steel belt hoops to secure the installation and prevent electrical hazards.
Conclusion
Installing an OPGW cable joint box is a detailed process that demands precision at every stage. From choosing the right location and preparing the cable and joint box, to splicing fibers and sealing the enclosure, each step is critical to preserving the optical and grounding functions of the cable. By following this guide, telecom engineers and product managers can ensure a secure, reliable installation that supports seamless connectivity and enhances overall network performance.
Footnotes
-
This link will provide an overview of OPGW cable joint boxes and their role in telecommunications. ↩
-
Guidance on using an OTDR ensures that the quality of the splice is verified post-installation. ↩
-
Explains how heat shrink sleeves work to protect fiber splices from environmental damage. ↩
-
Outlines the proper mounting kits and accessories needed for a secure installation of joint boxes. ↩